
- What are AOV layers?
- When do you use the AOV layer file?
- How can I check the file has multiple layers easily in Nuke?
- How do I separate a single pass on multiple layers (AOV layer) in Nuke?
- How to merge multiple layers into multiple layers(AOV layer) and render out?
Hi, it’s Gabrielle. I want to write about AOV layers today since I am scripting some new code for an upcoming plugin that easily separates layers. In this post, I want to let you know how to manually separate and merge the layer. You will also learn how to easily check AOV layers.
What are AOV layers?
You can include multiple passes in one file (usually ending in .exr), and it’s also called a multi-pass rendered image. Multi-pass channel file formats such as multipass EXR store each element in a separate buffer, which is used for later synthesis and adjustment.

What are AOV layers?
When working with AOV layers, you can…
- Check multiple layers easily
- Save files efficiently
*Please check the sample .exr file here : download sample image
When do you use the AOV layer file?
When you receive a multiple pass file and want to split it into a single pass, you can manage it in detail.
For example, if you only want to change a reflection of the object, you can easily manage this by only processing one specific pass.

How can I easily check that the file has multiple layers in the Nuke?
1. viewer
First, check your viewer to see if the pass you want to adjust is available

2. layer contact sheet
Connect the ‘layer contact sheet’ from the library. If you click on ‘show layers name‘ it will be easier to see which layer is included.

3. shuffle
- If you connect shuffle and click on the drop-down, you can see which layers are contained in a file

How do I separate a single pass on multiple layers (AOV layer) in Nuke?
You can easily select a single pass using the shuffle node.
- Create the shuffle node
- Select the pass In the B section(input)


How to merge multiple layers into multiple layers(AOV layer) and render out?
1. Create your alpha (mask)
I’ll set up a pass for a dog. I created a simple roto for him.

2. Shuffle your alpha to a new layer
Then, create a shuffle node and select ‘new’ after clicking the drop-down on Output layer.
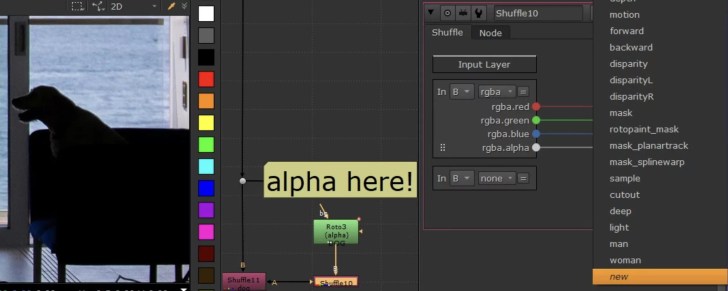
Create a new layer named ‘dog’.
Please click Auto : ‘rgba’ to automatically create red, green, blue, alpha channels.

*Once you create your new layer, be sure just left this shuffle :
In : rgba
Out : rgba

3. Shuffle a new layer to your main node tree.
Create a new shuffle and set Input/Output layers correctly.
Once you set it right, you can check the new layer by changing the viewer setting to a new layer.

After shuffling the path and connecting it to the main node tree, you can render out the multiple layers. Don’t forget to set the channels to ‘all’ and the file extension to ‘.exr’ when rendering!

In this article, we delved into the world of AOV layers and demystified their use in Nuke. Mastering AOVs not only optimizes your workflow but also allows you to manipulate specific elements with precision. Whether you’re separating, merging, or rendering, a clear understanding of these techniques will ensure flawless composites. Dive into our related resources for a fuller understanding and stay ahead in your Nuke journey. Until next time, keep composing! 🌌🎥
If you have any problems with this content, please contact yoogabrielle@gmail.com
[Related Posts]
Nuke Compositing 4 Beginners #2 | channels AOVs, merge & blending modes by Hygo’s desk